
This article is a guide for getting started with PARA, an organizational system for your digital life.
Here’s the 5-step process I recommend you follow:
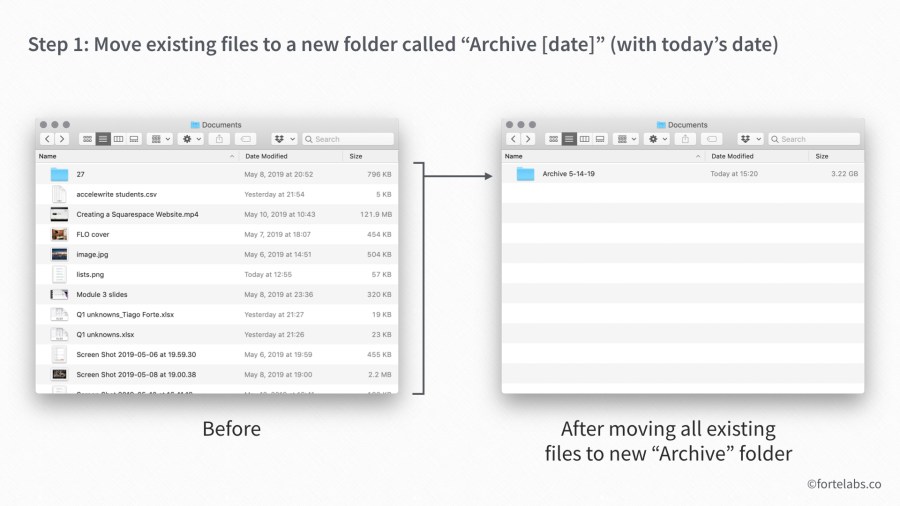
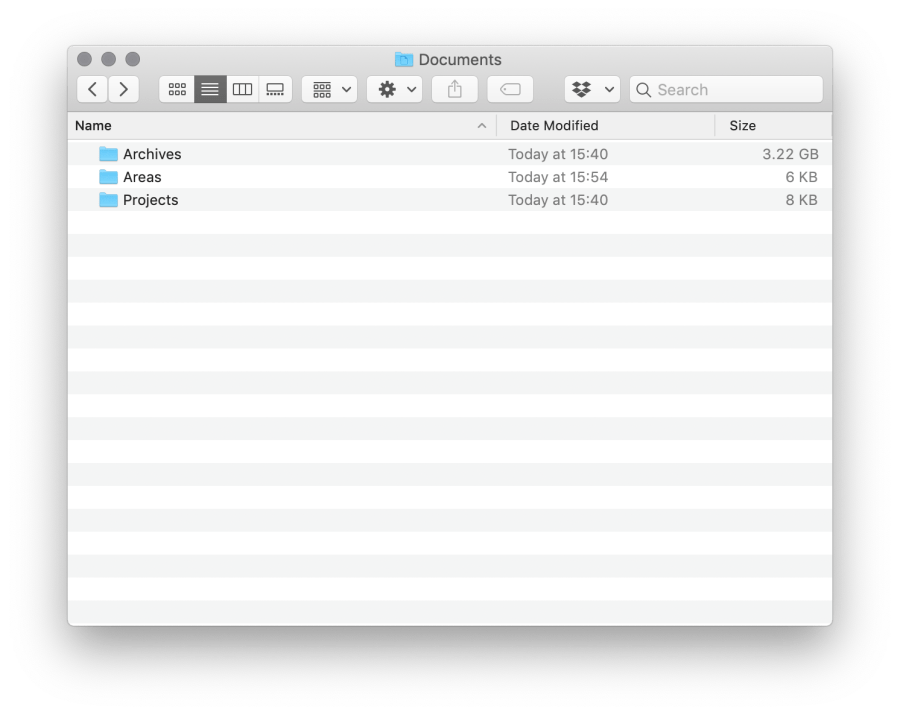
- Step 1: Move existing files to a new folder called “Archive [date]” (with today’s date)
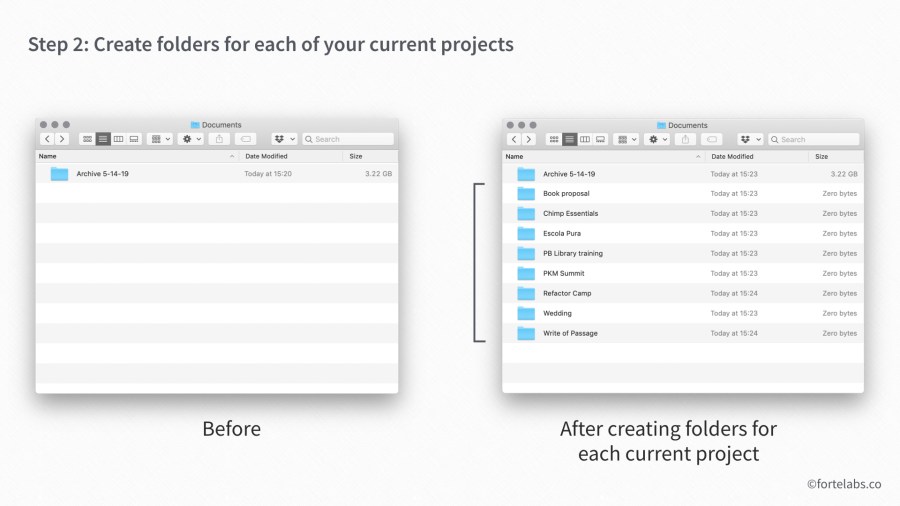
- Step 2: Create folders for each of your current projects
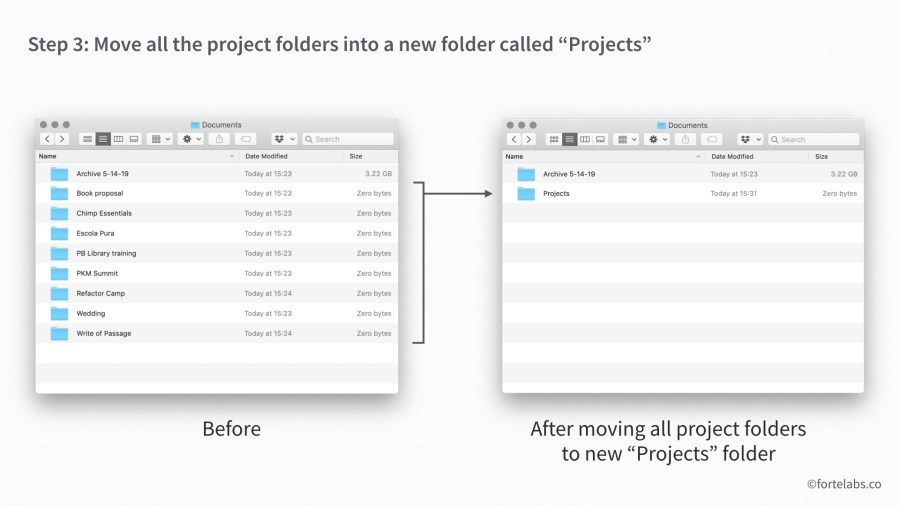
- Step 3: Move all the project folders into a new folder called “Projects”
- Step 4: Create a new “Archives” folder and move the existing one into it
- Step 5: Create new folders only if and when you need them
Step 1: Move existing files to a new folder called “Archive [date]” (with today’s date)
This is the “line in the sand” moment. Instead of trying to “migrate” hundreds of old files into a new system, like a hoarder moving all their stuff into a brand new house, wipe the slate clean and begin anew.
You aren’t actually losing all your existing files. If you really need something from the past, you are always free to dive into the archive, where you will find everything exactly as you left it. But in the meantime, they are out of sight and out of mind, freeing you to focus on new projects and goals.
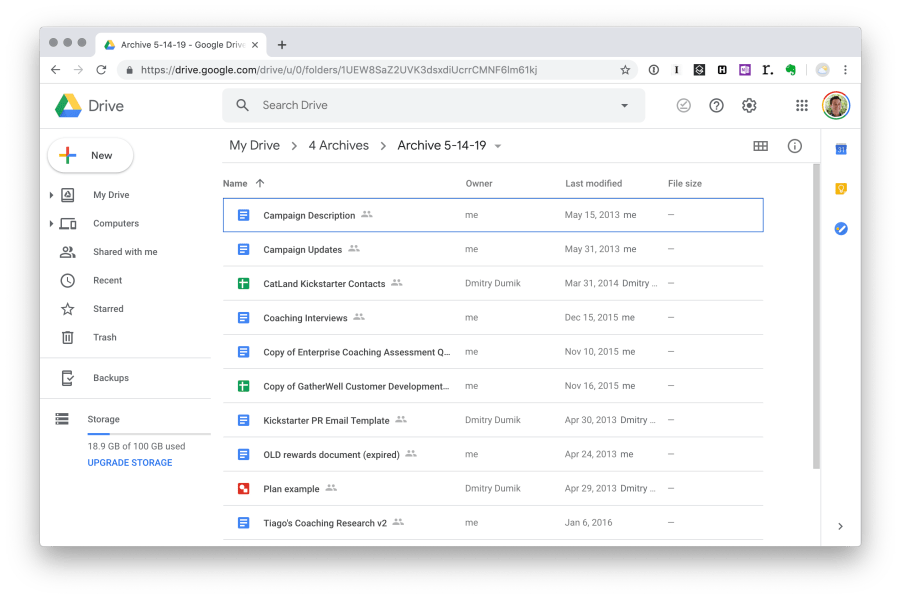
In your Documents folder on your computer, you’ll go from what is likely a morass of confusing files cluttering up your workspace, to a centralized Archive:
Step 2: Create folders for each of your current projects
Now that you have a beautiful blank slate, it’s time to create a little bit of structure to store the new things you’ll be creating and capturing.
The best place to start is to create a single folder (or notebook) for each of your current projects. You can complete the Project List Mindsweep exercise to identify your list of projects. Once you’ve created a folder or notebook for each of the projects you’ve identified, you’ll have a minimal but complete set of containers to store anything you might be working on:
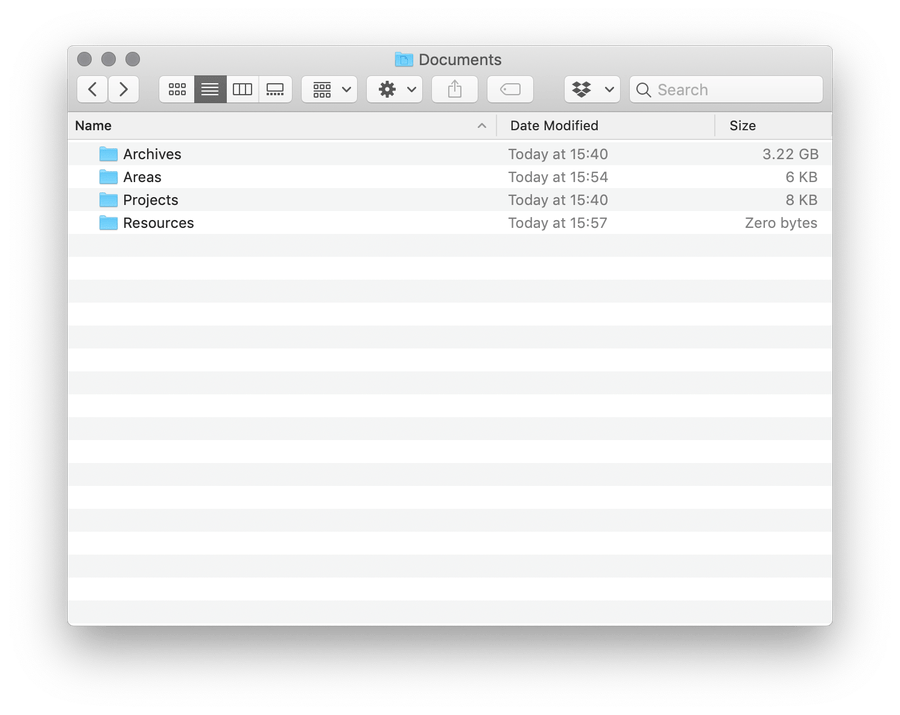
Step 3: Move all the project folders into a new folder called “Projects”
Place all these project folders inside one folder called “Projects,” so that you can find them all in one place:
Step 4: Create a new “Archives” folder and move the existing one into it
Move the archive of existing files into a new folder called simply “Archives,” so that you can separate what was saved before today’s date from what is saved in the future:
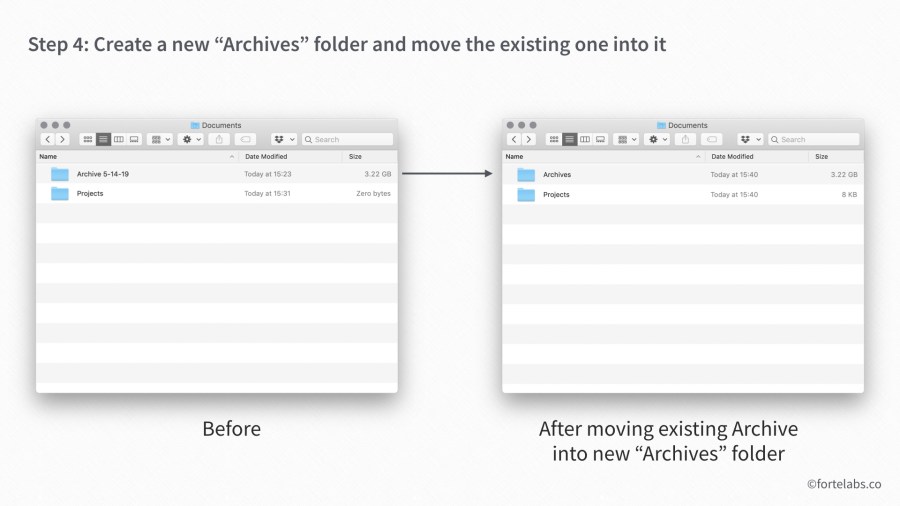
This leaves you with the two essential PARA folders – Projects and Archives. The former you can use for storing files you’re currently working on, and the latter for archiving away anything you’re done with.
Step 5: Create new folders only if and when you need them
Although you could move all your old files into your newly created Project folders, I don’t recommend it. Since you don’t actually know which of these files will be useful, and for which future projects, it’s best to leave them just where they are. Instead of doing a lot of upfront work to organize them, you can search them out only if and when you need them.
The other two remaining PARA folders – Areas and Resources – can and should come later, once you have something to put in them. New information typically arrives via your projects – the things you are actively working on right now. But once there, you’ll often find that some pieces of information are useful beyond just that one project.
For example, you might find that a workout routine you used to prepare for a marathon (a project) is something you’d like to continue doing. You can create a new folder called “Exercise” and move it there, so you always know where to find it. Put this “Exercise” folder in a new folder called “Areas”:
Or maybe you learn some new project management techniques during a client engagement, but once it’s finished, you decide you’d like that knowledge to remain available for future projects. You could move the note containing this knowledge to a new folder called “project management,” and place it inside a new “Resources” folder:
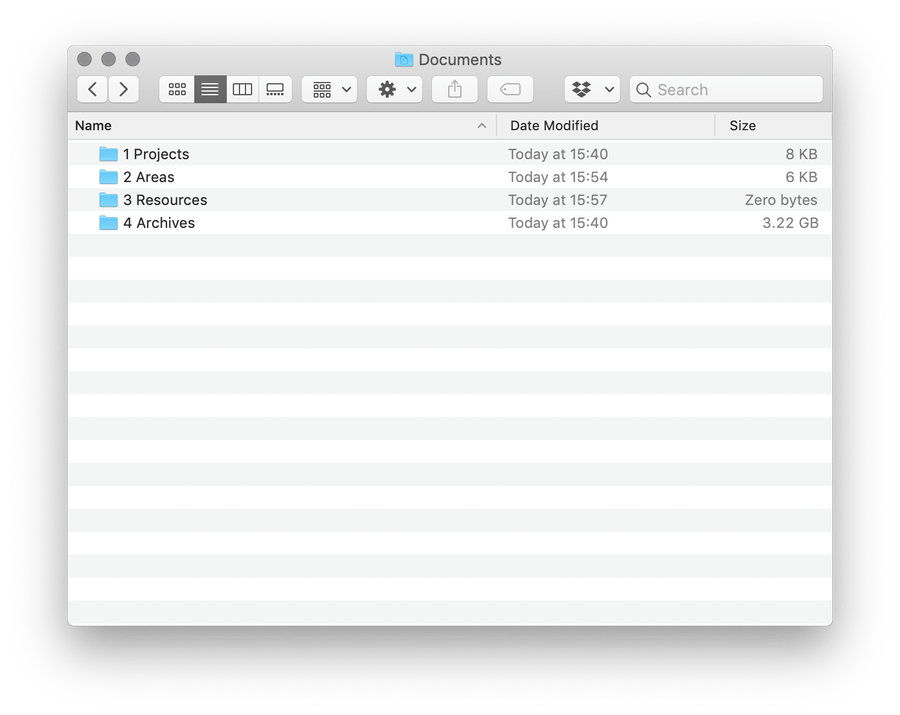
Optionally, you could then number them from 1 to 4 to keep them in order of actionability:
And now you have a fully functional PARA system!
Your projects provide you with a steady stream of insights and learnings, and then some of that knowledge gets filed away in Areas and Resources for future reference.
CONSISTENCY ACROSS PLATFORMS
The process described above can be performed on any platform where you store valuable knowledge, that you want to be highly actionable for your day to day work.
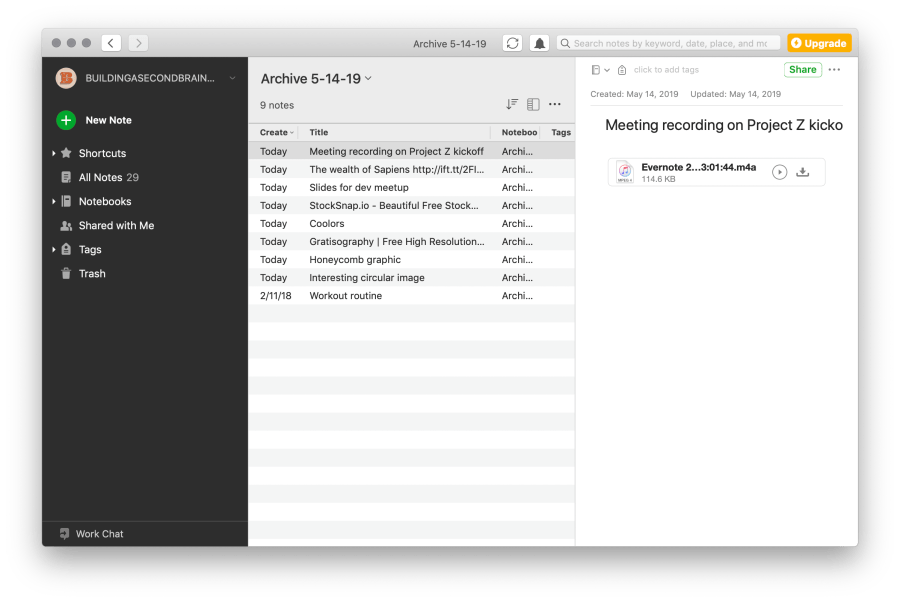
For example, if you already have digital notes that you’d like to preserve for the future without having to go through and organize all of them, just move them all to an “Archive [date]” notebook as described above:
The same goes for any other place where you store valuable knowledge, such as a cloud storage service like Dropbox or Google Drive:
Just remember to use the same titles for your projects and areas across different platforms, for consistency and ease of use:

Frequently Asked Questions
WHAT KINDS OF THINGS SHOULD I SAVE?
You are looking for insightful, high-value, ambiguous yet impactful information that you will be able to revisit, connect, and combine together to stimulate future thinking.
Here are some good questions to ask yourself when considering whether to save something:
- Is this something that could inspire or help me if it surfaced at some point in the future?
- Is this potentially a useful source, building block, or tool for future projects?
- Is this unique, personal, or hard-won knowledge worth revisiting over time?
- Is this something that I’m unlikely to find in the future when I need it?
Common kinds of information that people tend to save include:
- Book notes
- Excerpts from online articles
- Quotes
- Notes from audiobooks or podcasts
- Screenshots and web bookmarks
- Voice memos
- Photos, graphics, and diagrams
- PDFs
- Outlines and summaries
- Notes from conferences or events
- Interviews or FAQs
- Templates & checklists
- Notes from webinars or online courses
- Brainstorms & mindmaps
- Slide presentations
- Notebook sketches
- Journal or diary entries
- Marketing/business ideas
- Email newsletters
- Travel ideas and plans
- Notes from classes or workshops
- Reading list (or Already Read list)
- Meeting notes and recordings
- Project planning notes
- Work samples and portfolio
- Goals and dreams
- Productivity/health tips
- User manuals/guides
- Writing ideas/prompts
HOW DO I KNOW WHERE TO SAVE A GIVEN PIECE OF INFORMATION?
My recommendation is to save things in your digital notes app by default, since then it will be searchable and synced across all your devices. But there are a couple situations where it makes more sense to save it elsewhere:
- Is it sensitive information that you’d like to keep secure? Notes apps generally don’t have the best security, so it’s best to save things like passwords, medical records, or financial data elsewhere
- Is it a very large or specialized file? Notes apps don’t usually handle large files like videos or graphics files very well, so it’s best to save them in a dedicated app
HOW DO I SAVE THINGS IN MY DIGITAL NOTES APP?
Here are some of the most common methods for savings things to Evernote, and there are equivalents for other popular notes apps:
- Evernote Helper (Mac, Windows): quickly copy-and-paste text or drag documents directly into a small pop-up window
- Mobile apps (iOS, Android): share text, photos, images, or files directly to Evernote using your smartphone
- Web Clipper (Chrome, Safari, Firefox, Internet Explorer): capture selected passages, screenshots, or full webpages from within your browser
- Dropping on dock icon (Mac only): drag-and-drop files on your computer directly onto the Evernote icon in the dock
- Kindle and Apple Books: use the built-in export options for the two most popular e-readers to send your highlights directly to Evernote
- Email-to-Evernote: forward emails directly to Evernote using a special email address
- Mobile app photo capture (iOS, Android): take photos of paper pages with the mobile app
- Liner extension: highlight sentences in your browser and export them to Evernote with one click
- IFTTT and Zapier: link together other apps and services with Evernote, so content gets imported automatically
- Drag to note: drag photos and attachments directly into the body of a note
- Evernote integrations with other apps
For more details, read the PARA Operations Manual. It contains more guidelines on how to categorize notes, a description of how to maintain your files, and other frequently asked questions.
Thank you to Ellen Koenig, Scott Krouse, Moritz Bierling, and Clay Nichols for their comments and suggestions on this article.
Follow us for updates on Twitter, Facebook, Instagram, LinkedIn, or YouTube.
The Only Subscription
You Need to
Stay at the
Edge of AI
The essential toolkit for those shaping the future
"This might be the best value you
can get from an AI subscription."
- Jay S.
Join 100,000+ leaders, builders, and innovators

Email address
Already have an account? Sign in
What is included in a subscription?
Daily insights from AI pioneers + early access to powerful AI tools


 Front-row access to the future of AI
 Bundle of AI software

 Evan Armstrong
 Dan Shipper
Comments
Don't have an account? Sign up!